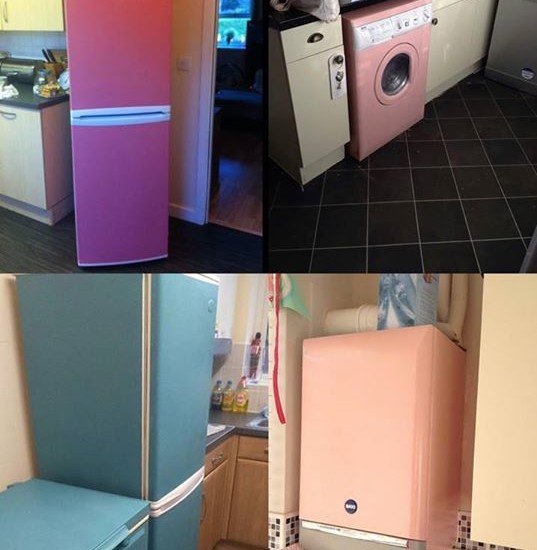
So the latest ‘craze’ is to paint your kitchen appliances an awesome colour using special chalk paint, it turns something boring into something pretty + the paint can be used on pretty much anything around the house from candle sticks to kitchen cupboards.
You will need:
- some of this paint > http://amzn.to/1CNoUsY (750ml would do two tall fridge/freezers worth)
- to seal it / make it wipeable apply http://amzn.to/1Hl7UHX afterwards
- a roller (e.g. http://amzn.to/1Onmmoo or http://amzn.to/1Hl8Ko6) to do the major work
- a small brush to do the tight corners
- some http://amzn.to/1IgE8W0 tape to mask off the areas you don’t want to paint
_____
Steps for Painting a Fridge:
Warning: Doing this most likely will void your warranty on any electrical items + doing so on a boiler could cause issues with gas safety inspections. We suggest you do this on cupboard doors / other items but here are the steps:
- Remove the door handle (if there is one) and unplug the fridge.
- (Optional) – Lightly sand the surface of the refrigerator with a fine grit sandpaper. This will help the paint adhere to the surface. You don’t need to sand the original paint completely off. Read the instructions on the paint tin as some will vary.
- Wipe down the surface with a clean damp rag and leave to dry.
- Tape off any exposed edges with something like http://amzn.to/1IgE8W0
- (Optional) – Apply a magnetic primer coat > http://10ws.co/1CNs6Vr – It’s expensive and isn’t the best but will be useful for some people
- Paint the first coat of http://amzn.to/1CNoUsY – The paint will probably look very different to what you expected, but don’t worry. It’s normal. See proof on http://10ws.co/1IgHfx0
- Wait for the first coat to dry completely before adding the second coat. Ensure it’s PERFECTLY dry unlike normal wall paint.
- (Optional) apply a third coat, use your judgement.
- Seal it / make it wipeable by applying some wax http://amzn.to/1Hl7UHX – If you want to leave it as a chalkboard style fridge (e.g. where people can write on it) then don’t do this step.
- Start looking at the rest of your furniture and think how you can improve it.
Thanks to Hannah, Sharon, Cathy & Jen for their photos, help & inspiration.
Original Facebook post > http://10ws.co/1aLT3N0

